WordPress provides easy way to create and manage your blog. you can easily modify, customize and enhance functionality of your WordPress blog. You don’t need to change the core functionality of your WordPress blog. it provides easy way to add functionality with WordPress plugins. A WordPress plugin is a progam or can say a set of one or more functions which is written in the PHP scripting language which adds a specific set of features to your WordPress blog.


Step 1 : File Structure
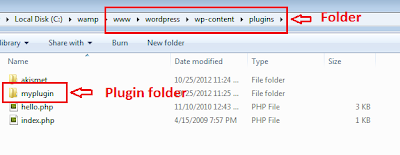
In wordpress, the plugin directory is available inside the wp-content directory. All plugin folders are available inside the wp-content folder. For smaller plugins which only have single filname.php file, can be placed directly into plugin/ directory. Howerver when you have more complicated functionality then it is useful to create a sub directory named after your plugin. you can also keep your Javascript, CSS, and html include into your individual plugin.You can also add read.txt if you are palnning to offering your plugin for download. This file will contain your plugin name and what the plugin does.

Step 2 : Writing code for simple plugin
Create a simple php file named with the plugins specified name.
Ex: Here my plugin name is "myplugin", so my file name is "myplugin.php".
Write the following codes inside the "myplugin.php" file.
<?php
/*
Plugin Name: My Plugin
Plugin URI: http://www.pluginurlhere.com/
Version: Current Version
Author: Name please
Description: What does your plugin do and what features does it offer…
*/
?>
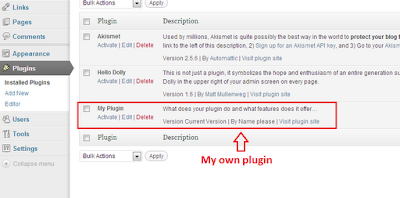
Once you write the code the in the php file, it will show up in your admin panel. For your reference, check the below image.

Step 3 : Naming conventions and Best practices
WordPress doesn’t need any specific code structure into your plugin. if you are well versed with php oops concept, then its best to handle using class and functions.
Since there are so many internal functions already defined you can avoid duplicates by prefixing a label to all your variables and function names.
<?php
define("Variable", "Varriable label value");
function content_example_function( $limit ) {
// some code goes here
}
?>
Step 4 : Diving Into Hooks, Actions and Filters
Hooks are provided by wordpress which allows your plugin to hook into the core functionality of your blog. The hooks are divided into two parts that’s Actions and Filters.
Actions are occured during specific events. Below are list of few important actions of Worpdress.
add_action('save_post', 'notify');
In above code have two variables, the first holds the name of our hook we’re targeting. In this case save_post which means whenever a new post is saved we’re going to call our function defined in the second parameter. You could obviously update notify to be whatever function name you’d want to run, however this isn’t required for our current example plug-in.
Filters are occurred to modify text of various types before adding it to the database or sending it to the browser screen. your plugin can specify that one or more of its PHP functions is executed to modify specific types of text at these times, using the Filter API. For example, you may create a filter to change $the_content which is a variable set by WordPress containing the entire post content of a WordPress article. For our plug-in we will be taking $the_content and shortening the length of characters into an excerpt.
Actually Filters are handy when you are writing plug-ins to customize the looks and feel of your blog. These are especially popular when writing sidebar widgets or smaller functions to change how a post should be displayed. Below is a sample line of code showing how to apply a filter.
add_filter('wp_title', 'func');
Step 5 : Complete Plugin Logic
This is a complete logic of our plugin. it can be placed inside your theme’s function.php file. the purpose of this code is to limit the range of post content.
<?php
function myplugin_excerpts_content( $limit ) {
$content = explode( ' ', get_the_content(), $limit );
if ( count( $content ) >= $limit ) {
array_pop( $content );
$content = implode(" ",$content).'…';
} else {
$content = implode(" ",$content);
}
$content = preg_replace('/\[.+\]/','', $content);
$content = apply_filters('the_content', $content);
return $content;
}
?>
The above code just require general understanding of how your functions should be written. you will notice that we are using a call to apply_filters which is another WordPress-specific function.
The function above is named myplugin_excerpts_content(). This only requires 1 parameter named $limit. This could also be shortened to $limit which should store an integer specifying how many characters to limit your excerpt to. The content is used on full post pages and also static pages like about us, contact etc.
<?php
echo myplugin_excerpts_content(60);
// display page content limited at 60 chars
?>
Step 6 : Installing And Running The Plugin
This is just a general description how to develop wordpress plugin. if you want to run the code above. simply download the plugin file and rename it to .php file. Then upload this file to your blog’s /wp-content/plugins directory.

After uploading plugin file, go the the admin panel and browse your plugin and make it active. Once you activate nothing new will happen, until we manually add in our function call. To do this simply navigate Appearance -> Editor and look for single.php. This file contains all the HTML/CSS for your basic article post page. Scroll down until you find the_content() and replace with the example code above. this will limit all your article pages to 60 charaters. you can also add this function to other files.
In this article I have presents just a general idea of how you can start working with WordPress plugin development AS you gone through this small article, you can understand that plugin has very vast and deep internal functionality. But you can easily command over by start from here or also through WordPress official Documentation, development community and forums.
Thanks for an insightful post. These comments are really helpful.. I found a lot of useful tips from this post
ReplyDeletefreelance php developer
Thank you for your feedback.
DeleteThis comment has been removed by the author.
ReplyDeleteThank you for your feedback.
DeleteI really appreciate on your post. I really needed to know about it.... I tried to write something similar to your blog... read more
ReplyDeleteThank you for your feedback.
DeleteNice steps for wordpress plugin.
ReplyDeleteWordpress Development Company
Amazing information about Open Source Development Services. Open Source Development is best way to increase your online business through attractive website. We have total solution for open source development like Magento, WordPress, Drupal, Zen Cart and many more.
ReplyDeleteHey thanks a lot for explaining me the step to step procedures for developing the WordPress plugin. These steps really helped me a lot.
ReplyDeleteWordpress Development Company
To develop plugin is a great move to improve the functionality of your blog by adding some great and impressive features. To start developing small plugins will be a good thing to have complete understanding on that subject.
ReplyDeleteWordPress Development
ReplyDeletehas become essentials for development of business and it is carried out by experts. It is further explained as CMS which is used to create blog and business websites.
very nice blog this is i like this information so much
ReplyDeletebest web design company
The best guide for wordpress development thank you so much i appreciate your blog very usefull!!!!!!!!!!!!!!!!!
ReplyDeletewordpress development company
nice post.
ReplyDeleteWeb Development Company
great
ReplyDelete